Tutorial: Tunnels
This tutorial is expected to be followed after installing Yunohost onto your own server, and getting an application installed via Yunohost. If you installed Yunohost in the cloud, then you don't need to follow this tutorial (because cloud servers are already on the public internet).
Now you have a local server, but its not visible on the internet yet.
The first thing is to remember "The Internet" is a network of networks. When your local server is connected to the local wifi (or via an ethernet cable) it is visible on the local network, which includes other devices connected to the same wifi, but is not yet visible to devices on other networks (connected to other WIFI or access points).
The diagram below shows two different "home networks" connecting to the internet. Each "home network" is its own local network.
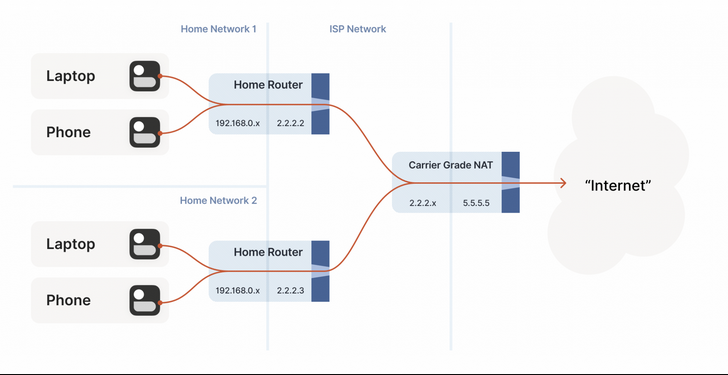
Some people consider this a sort of design flaw of the internet — but there are pros and cons. On the positive side, it makes it slightly easier to secure the local network (as connections from other networks require special provisions). On the negative side, it makes it more difficult to build fully peer-to-peer apps or to run home servers, although not impossible, and there are a wide range of ways around this, that let a computer from one local network communicate directly with a computer on another local network.
This guide will go over some of these methods, specifically in the context of self-hosting. NAT Traversal (https://en.wikipedia.org/wiki/NAT_traversal) and NAT Hole-Punching (https://en.wikipedia.org/wiki/Hole_punching_(networking)) are two related technical terms for these rabbit holes.
⚘⚘⚘⚘⚘⚘⚘⚘⚘⚘⚘⚘⚘⚘⚘⚘⚘⚘⚘⚘⚘⚘⚘⚘⚘⚘⚘⚘⚘⚘⚘⚘⚘⚘⚘⚘⚘⚘⚘⚘⚘⚘⚘⚘⚘⚘⚘⚘⚘
Method One: Port Forwarding
This was the method used in Season One Of Solidarity Infrastructures, and it works, but it requires access to your router, and has some positives and negatives.
On the positive side, if you have access to your router, you can set up port forwarding without messing with routing through any computers any where else (which other solutions listed here require). This is a form of autonomy that could be useful.
Yunohost provides a guide for how to setup port forwarding here.
On the negative side:
- every router is different, and so it is hard to write a guide that works for all routers
- based on living situation, not everyone has access to their router, or the admin interface for their router (which is required for configuring port forwarding)
- if you forward a port on your router, this is one less security protection for your local network. note, having an open port on your router is not itself a security vulnerability (and I've done this many times) — but many things in computer security work by sort of piling on layers of extra protection, in case some other layer of protection breaks. so opening a port is one small protection guard removed.
- when you use port forwarding from your home router, the IP address of your home router is visible to folks who access your home server
For all of these reasons, I spent some time looking into alternative ways to make your server visible to the public internet, that don't require changing any configurations on your router. The alternative method I've found that doesn't require port forwarding and is working the best so far is using Tunnels (aka a VPN) and is described in the next section.
⚘⚘⚘⚘⚘⚘⚘⚘⚘⚘⚘⚘⚘⚘⚘⚘⚘⚘⚘⚘⚘⚘⚘⚘⚘⚘⚘⚘⚘⚘⚘⚘⚘⚘⚘⚘⚘⚘⚘⚘⚘⚘⚘⚘⚘⚘⚘⚘⚘
Method Two: Tunnels With Tailscale
Tailscale is one of the most popular overlay networks (Zerotier is another popular one). Both of these tools let you add different devices (aka computers) to a virtual network. All of the devices that are added to the virtual network can then interact with each other as though they were on the same local network.
In the background, a virtual network uses tunnels to connect the different computers. Interestingly, on a network level, a tunnel appears exactly like an ethernet cable — so to your operating system a virtual network appears the same as though you had connected all of these computers in different places with giant ethernet cables.
To setup a tailscale tunnel with your server, login to the terminal of your server (using a monitor, or using SSH from your laptop via this guide), then run the following command on your server terminal to install tailscale and connect to the gateway co-op tailscale network:
curl -fsSL https://tailscale.com/install.sh | sh && sudo tailscale up --auth-key=<redacted>
Note that the auth key in the previous command is a secret password that connects you to the gateway co-op tailscale network, so please don't post this command publicly or share it with others outside of the class.
After running this command, for reasons that are currently unknown to max, sometimes its necessary to run the second part again:
sudo tailscale up --auth-key=<redacted>
You can then confirm tailscale is now running by running this command that checks the status of a running service, and looking for green letters that say 'active (running)':
sudo systemctl status tailscaled
Note the d at the end of tailscaled in the command above (for some reason the systemd process for tailscale is called tailscaled).
You should then see something like this (and then you just need to press q to exit this screen and return to the terminal prompt):
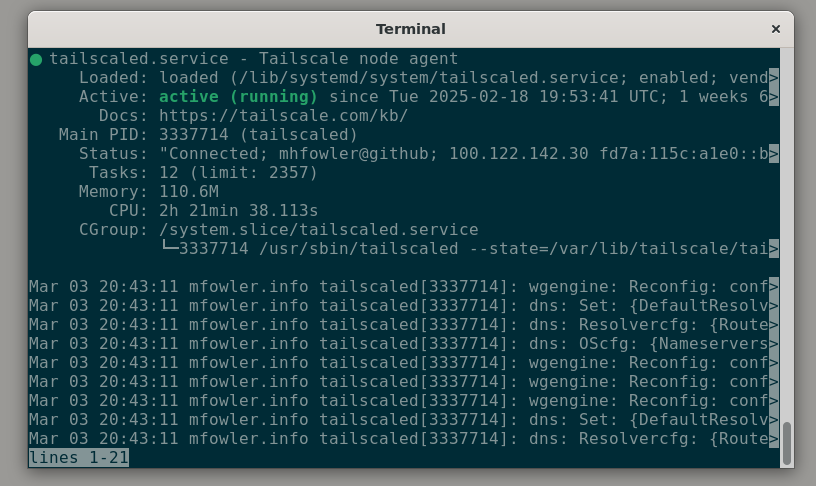
Lastly, run the following command, which returns the IP address of your new private tailscale tunnel on the class tunnel network. Then we just need to tell the tunnel-gateway-server to forward requests from a particular domain to your tunnel IP. Here is the command to get the IP address of your tunnel:
sudo tailscale ip
To register your IP address with the tunnel-gateway-server, you then need to navigate to https://g1.commoninternet.net/admin/.
Login with the the username ==redacted== and the password ==redacted== . you can then use the form on that page to register a new subdomain of commoninternet.net to point to your tunnel IP address. you can also use this form to update the IP address that a subdomain is registered to if you need to.
advanced usecase: you can also register your own domains here that you own as well and it will also work, you just need to ensure through your own domain registrar that your domain has an A record which points to the IP address of the tunnel gateway server (143.244.213.108), and then also register your custom domain-to-tunnel mappings on the tunnel gateway in the same way.
The gateway web admin interface looks something like this:
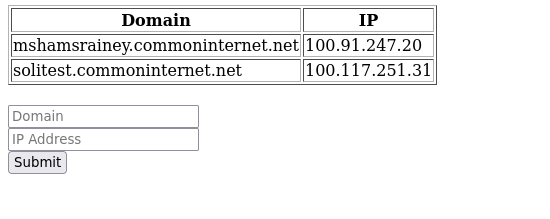
After wiring up a domain (using either method) to point to your tunnel IP address, you also need to add this domain to your yunohost server admin, via the yunohost admin domain interface (via yunohost.local or however you access your yunohost server admin interface).
Finally, now if you install an application on your yunohost server at the domain you connected with your tunnel (e.g. yourname.commoninternet.net), you should be able to see your local yunohost application running on your local server through the public internet from anywhere in the world with an internet connection by visiting yourname.commoninternet.net in the browser.
🌐
Content warning: more technical explanation follows:
On a more technical level, the domain commoninternet.net actually points to a Digital Ocean VPS in the cloud, which is also a member of the gateway co-op tailscale network. This VPS receives requests to commoninternet.net and then forwards them to your local device via the tailscale tunnel, using a reverse proxy. It's kind of a mouthful — another way to say it would be there is a server in the cloud which is already visible on the public internet, and it receives requests and forwards them to your local server via the tailscale virtual network (which it is also a member of).
Setting up a virtual gateway server like this is kind of complicated, and wouldn't be recommended if you are just getting started with self-hosting. But if you have a friend who is already running a gateway (which you do), this is an easy way to get your local server visible to the public internet. If their gateway goes down, or you want to be even more independent, you can always switch to using port forwarding instead. All your data still lives on your device, the cloud server is just a gateway that proxies requests (which also has the benefit of hiding your local IP address from the public, and not requiring you to alter your home router configuration in any way).
It is also possible to later switch to one of the other methods of getting your server on the internet, such as cloudflare tunnel, or ngrok.
⚘⚘⚘⚘⚘⚘⚘⚘⚘⚘⚘⚘⚘⚘⚘⚘⚘⚘⚘⚘⚘⚘⚘⚘⚘⚘⚘⚘⚘⚘⚘⚘⚘⚘⚘⚘⚘⚘⚘⚘⚘⚘⚘⚘⚘⚘⚘⚘⚘
Method Three: Ngrok
Ngrok is a proprietary tool for remotely accessing a computer. It may have other use-cases now too, but that's what I always used it for.
You can use ngrok to create a tunnel, which lets you communicate with the computer being tunneled to as though you were on the same local network. It uses Ngrok-the-company's servers as an intermediary, and the free-plan has some limitations, but its still a practical and easy way to quickly make a tunnel so you can access a server from afar.
Instructions for how to install ngrok are here: https://download.ngrok.com/downloads/linux
After installing ngrok, on your local server you can then run:
ngrok tcp 22
which will output an address you can use to ssh into your server remotely.
⚘⚘⚘⚘⚘⚘⚘⚘⚘⚘⚘⚘⚘⚘⚘⚘⚘⚘⚘⚘⚘⚘⚘⚘⚘⚘⚘⚘⚘⚘⚘⚘⚘⚘⚘⚘⚘⚘⚘⚘⚘⚘⚘⚘⚘⚘⚘⚘⚘
Method Four: Zerotier
Zerotier is one of the most popular overlay networks (and is an alternative to Tailscale).
Instructions for installing Zerotier on Linux are here: https://www.zerotier.com/download/#entry-5 (Yunohost runs on Linux, so this is the same for installing Zerotier on Yunohost).
You should then be able to run zerotier with the following command:
sudo zerotier-one
You can then run the following command to join a zerotier network:
zerotier-cli join <NETWORK_ID>
In the end I decided to switch to Tailscale instead of Zerotier as a recommendation because I was running into some bugginess with Zerotier tunnels and Zerotier also has a limit on the number of devices you can connect to a network on the free plan, where as with the self-hosted version of Tailscale there is no limit.